Showing posts with label Investigate. Show all posts

Saturday, 29 March 2014

Which one makes a sound? ~ baby play


Babies love to explore new things and this is a fun little game any tiny tot will enjoy!!

Suitable ages:
6mths- 2yrs (at the end if the post I will give some examples on how you can extend this for toddlers) 

Learning opportunities:
Exploring their senses
Fine motor control
Language 
 

To set this little game up I used four old film canisters. These particular ones have great lids that are very difficult to open and well sealed. Inside one if the canisters I 1/4 filled it with rice but you could use a small bell, dried lentils or anything of that nature. You can also use any small containers. Just make sure your baby is able to grasp the container easily and that it is well sealed so the contents do not be one a choking hazard.


More often than not any new item goes straight to the mouth. This is your babies preferred way to explore items. Encourage your baby to 'shake' the container. Model this and reward your baby with your facial expressions and voice. When your baby finds the container that makes a 'sound' congratulate them. Let them discover how some don't make any sound but this one does. 


When your baby is holding one container try passing them another one and observe what they do. Do they drop the one they have to hold the new one or do they grasp the new container with their spare hand? Your baby may pass the container back to you in a little passing game.

Bubba Finn enjoyed banging two canisters together!!
 
To Extend on this
For older babies and toddlers increase the learning opportunities by adding colours to the containers so they can discover which colour container makes a sound. You could do this with shapes and numbers also.
Use more containers, have two with the same objects inside for your child to match up. For example you could have two with rice inside and two with a bell inside. Ask your child which two make the same sound.

Enjoy

Play and Learn

Katey 

Tuesday, 18 March 2014

Hands on Learning while making Scones


Not many kids will ever turn down an opportunity to cook. Not only does it satisfy their naturally inquisitive natures it generally gives them some quality 'together' time filling up those emotional tanks, plus it usually means something YUMMY to eat!!
Parents and educators love cooking tasks with children as there are so many
 opportunities to learn.
 
I love cooking scones with kids. I find it is a great recipe to do with young children as there isn't too many ingredients or steps and it lets them get really hands in!!
 
Learning Opportunities
Language- labelling objects and actions, following instructions, retell
Maths- measuring, counting, number recognition, shape
Science- observation skills, recognition of the senses
Fine motor Development
Social - turn taking, sharing
Creativity
 
Suitable Ages
1+
 
The recipe I used for these scones I found here at Taste.com and I simply displayed it on the Ipad for Hman and Miss M to see.
 
To start with we measured out and counted 3 cups of self raising flour.


Little fingers getting a workout rubbing the flour and butter together. This takes awhile so my two were very happy to give each other turns.
All you need to do next is measure out the milk and add it.


More hands on fun kneading the dough and rolling it out. My 2yo needed some help with this while Miss 4 was quite independent.
 

Cutting out circles. Lining them up and counting them. Hman was able to observe big sis get this right and it's just so precious watching him copy her. She is a brilliant teacher!!
 
We popped them on a tray and put them in the oven to cook.


20 minutes later we had yummy delicious warm morning tea!
 
Spreading the jam themselves was also lots of fun!


Always supervise children when using an oven
 
Enjoy


Play and Learn
 
 
Katey

Monday, 26 November 2012

Magical Ice Painting ~ Christmas wrapping paper


Miss M loves Ice Painting and we have done it a variety of different ways such as using it to experiment with colour mixing, hiding objects in the ice to find as the ice melts and just plain painting with Ice for fun.

Regardless of how you choose to paint with ice your child will be experiencing their sense of touch as they respond to coldness of the ice. They will be investigating about solids and liquids as they see the liquid turn solid as ice when made very cold in the freezer, then be amazed as it turns back into liquid as it melts with their warm touch. They will be using their creativity and knowledge of shape, colour and lines as they use the ice to paint.

I wanted to use the ice painting as Christmas Wrapping paper so we added a little bit of magic!!


This activity was brilliantly timed thanks to Mother Nature.
On the Friday we put our ice trays filled with magical water into the freezer to turn to ice thinking we may get to paint with it over the weekend.

On Saturday afternoon we had a huge hail storm where ice literally fell from the sky!
Here is one of our downpipes.


We collected some of the hail to keep as ice in the freezer and watched as the rest of the hail melted away in the humid November weather.


Miss M was very happy the hail she collected.
She was not so happy with the very loud sound it made on our patio roof as it came down! Hail can be noisy!!


Here is one of the ice block trays we made to use.
I found this tray at Ikea a number of years ago and it has been well used as painting ice in my classroom and at home!

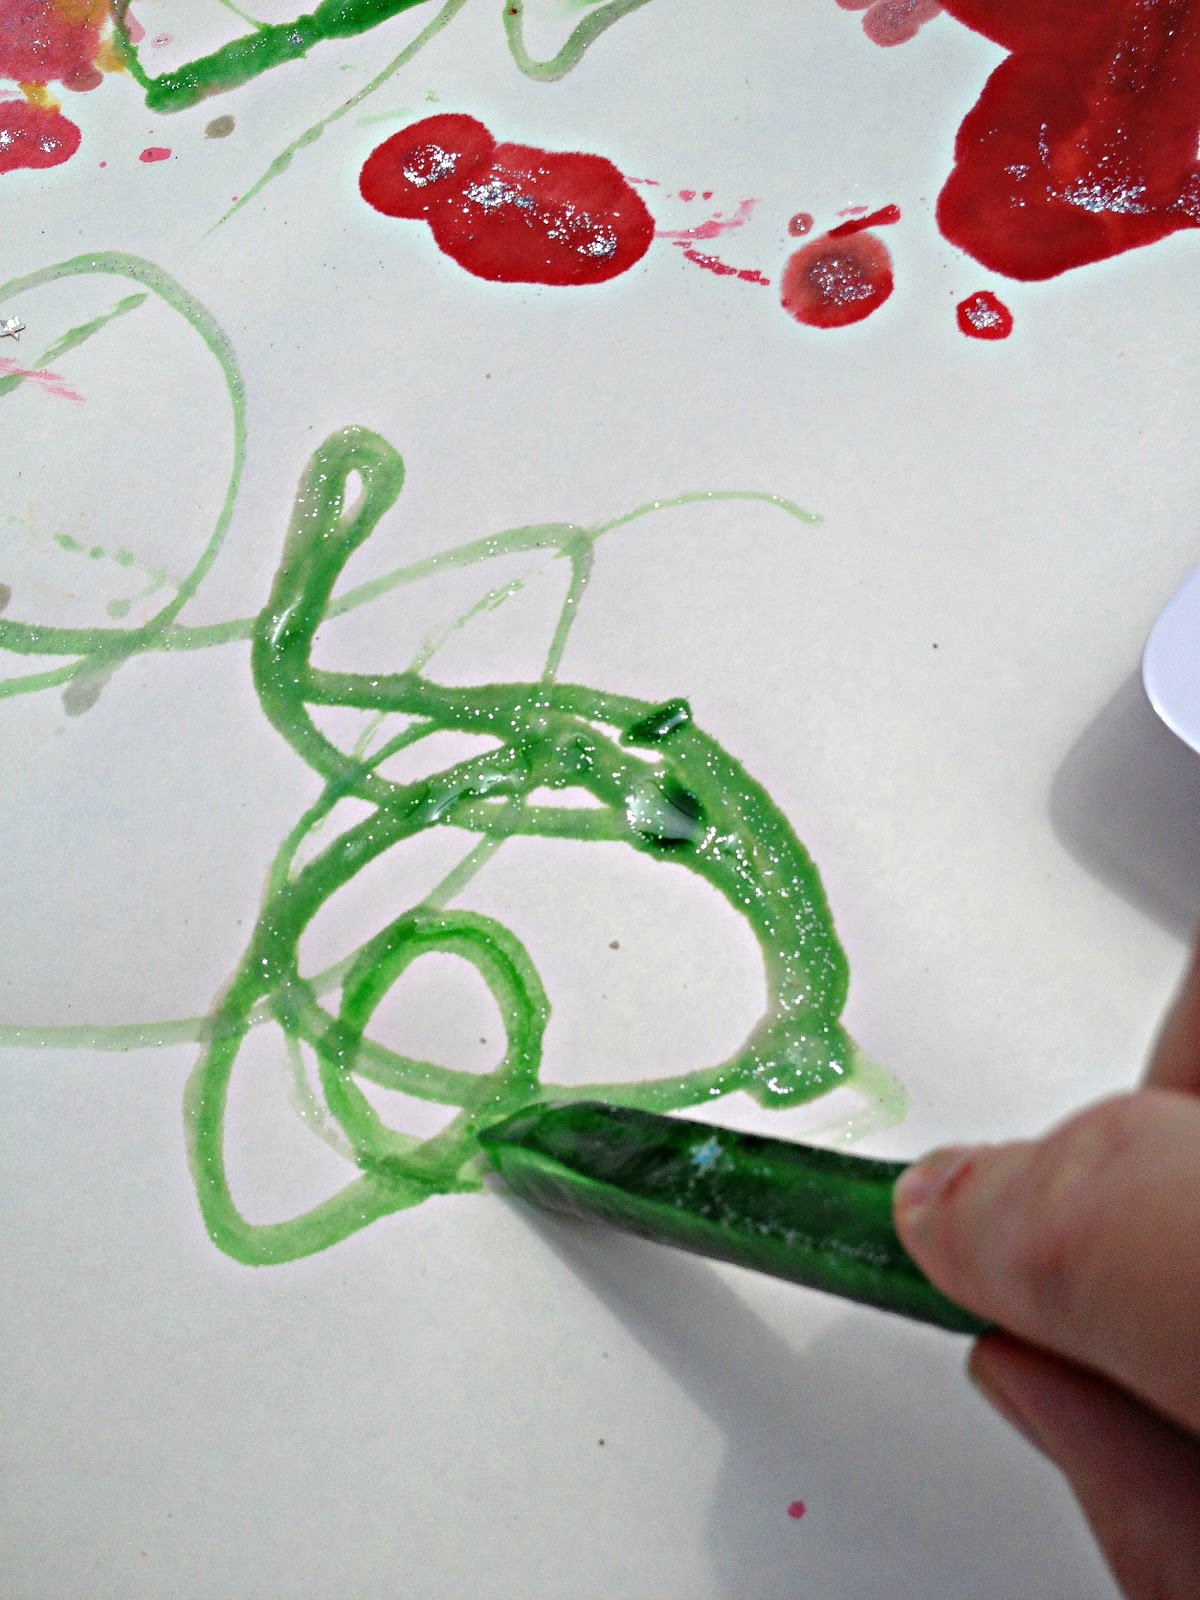
We choose 3 colours, red, green and yellow and we added glitter to the water. To make the coloured water we just added a few drops of food colouring. You want it quite dark so that it shows up brightly on the paper.
When you do this you will see that the glitter floats to the top, which is great as it looks impressive for little eyes!


We also made a smaller tray of ice blocks and I added a magical surprise inside some of them. I didn't do all of them as I planned on letting my 11month old do some ice painting also and these would pose a choking hazard for him.


Our Ice blocks ready to go!
The long stick ice blocks are fantastic for little hands and make drawing shapes, lines and writing with the ice lots of fun!


We did this outside and it was a little windy, hence the brick pavers used to hold everything down.

H man did pick up an ice block but I was not quick enough to get a photo before he decided, nah I don't want to do this...


...I'd rather play with the ball. Which was fine.
If your child has other ideas go with it, it's no fun for anyone otherwise. They may decide to come back to the task or not but for H man he wanted to play ball instead.
If your baby does want to paint however, always supervise carefully.


Miss M making swirly whirly patterns with the ice!


The glitter came off the ice and onto the paper really well.
I was soooo impressed with it!!


Older children could write or draw Christmas themed shapes.
If you weren't making Christmas wrapping paper you could use ice painting for
  • letter writing practise
  • number writing practice
  • name writing practise
  • shape drawing practise
  • Investigating colour mixing
Remember to
  • Talk with your child about what they are doing, seeing, feeling. Give them words for their actions.
  • Ask questions about what they are doing, seeing, feeling. Ask them what is happening to the ice.
  • Ask them to tell you about what they are doing.
  • Get them to tell you about their picture.
  • Make it real and meaningful for them, tell them for example "We are going to use this art that you create to wrap up Nana's Christmas present".
  • Relate it and link it back to real life experiences, "Remember when it hailed? Can you remember what hail is? What happened to the hail? That's what's happening to our ice.


As he played with the ball we left H man's ice to melt as it was.
Looks pretty effective also!


Wow look at that melted magical ice!

Grab some paint brushes and paint with it.
That's what we did!!!


Playing with coloured ice can make little hands a bit messy.
The food colouring does stain the skin but rest assured it comes off after a couple good hand washes with soap.

The experience is definitely worth it!!

Miss M was asking for more magical ice so I can see that we will be doing this one again very soon. Luckily it was so very simple.

It's a great activity for a warm day and you may even get some beautiful Christmas Wrapping paper to wrap up something special!

Stay tuned for more Home Made Christmas Wrapping Paper when I finish my post on Christmas Wrapping Paper 6 ways!

Enjoy

Play and Learn

Katey

If you enjoyed this post please feel free to share it

Tuesday, 20 November 2012

What's in the bag? Investigate touch

 
Miss M has been very interested in investigating her senses lately.
 
Through investigating her senses she is becoming more self aware of her own body as well as the world around her.
 
In this post I share how we investigated our sense of touch.
 
I have a wonderful surprise box that I use in my classroom and my 4 and 5yrolds love it!
 
 
At just 3, Miss M was not so keen to put her hand in this one.
Her sense of real and imaginery is not as well developed just yet.
 
I also have a wonderful surprise bag, but it was too big for what I had planned.
 
We used simple paper bags bought at the supermarket.
These bags can be reused for a number of art ideas.
 
 
I numbered the bags 1-5 so Miss M could choose and name which bag she wanted to investigate first!
 
Choose items of different textures, sizes and shapes from around the house to put inside each bag.
 
Ideas Include: loofah, sponge, scourer, rice, pebbles, brick, utensils, soap, soft toys, pegs. You can put wet items like slime, water, goop in small bowls inside the bags. The ideas are endless just make sure you have a variety of textures for your child to touch and explore.


The temptation to peek first is common.
Explain that they are going to use only their sense of touch to guess
what the object in the bag is. We aren't going to use our eyes to see,
but we are going to use our hands to touch.
 
Reassure your child that it is safe for them to put their hands
inside if they seem hesitant.
 
Have them predict what they think they might feel inside to prepare
them for the experience.


Hmmm what could it be?
 
Your child may want to whip the item out straight away.
Remind them that we are keeping it inside the bag so that we only use our hands to touch and not our eyes to see.
 
Ask them about what they can feel, don't just get them to guess.
Is it hard, soft? Wet or dry? Rough or smooth? What shape is it?
Can you feel any parts or pieces?
 
Ask older children to describe the object they are touching.
 
This activity couldn't be simpler, how bout giving it a try!
You can do it again and again with different objects.
 
Fantastic for developing Descriptive Language
 
 
A little extra~
  • When exploring touch I like to go outside. There are so many sensations and opportunities to experience touch. Children can feel the wind on their skin and in their hair. Touch grass, plants (as long as they are safe), trees, bark, paving, water etc.
  • Hands on Sensory experiences are great like this one ,

 
  • Younger children and babies will love this,

 
Baby treasure box
Always supervise babies when they are playing.
 
 
I hope you enjoy exploring the sense of touch with your little ones.
 
Play and Learn,
 
Katey
 
If you enjoyed this post please feel free to share it


Sunday, 11 November 2012

Science ~ Investigate taste with Sherbet


Science Investigations for very young children are a wonderful way for them to explore their senses and learn new language to communicate their keen observational skills.
 
While making observations in science children are very often able to use their sense of sight, touch, sound and even smell.
Here is a wonderful, fun and interesting way for your little ones to explore their sense of taste!
 
Making Sherbet


Recipe

 You will Need,
 
1 teaspoon citric acid
2 teaspoons icing sugar
3 teaspoons o f jelly crystals
(you don't need to use the crystals, you can substitute with more icing sugar however it was a great motivator for my reluctant taste tester)
1 teaspoon of bicarb soda / Baking Soda
 
 
Mix all the ingredients together.
 
Touch it~ What does is feel like? Is is wet or dry? Hard or soft? etc
Smell it~ What does is smell like? "yummy"
Look at it~ What does it look like? What colour is it?
 
 
Now taste it!
Miss M was rather confident from her previous observations of touch, sight, smell  that this stuff was going to taste pretty good so she filled her spoon ...
 
 
... Not quite what she expected LOL!
 
 
Talk about what it tastes like. Come up with different words.
Does it remind you of something?
 
How does it feel on your tongue and in your mouth?
What words can we think of to describe it?
 
sweet, sour, fizzing, tickling, zapping, foaming
 
 
Extend this:
 
  • If your child is adventurous and will happily try new foods introduce a taste testing platter. Use your senses to taste a variety of different foods. Include sweet, sour, salty and spicy flavours to develop descriptive language and discussion on similar and different flavours.  Use a blindfold for older children or disguise the food so they have to guess what it is.
  • You could do exactly the same with experimenting with different smells. I will put up a link to an activity we did on smell as soon as I post it!
 
  • Miss M is a reluctant trier of new foods, flavours and particularly textures so during our meals we are very often doing alot of investigating of the new foods on the plate. She'll try and touch it (sometimes she does not like to touch but she will pick it up with a fork, spoon or other utensils- children's tweezers or tongs are fun and motivational). Then she will smell it, all the while we are talking about what it smells like- what 'safe' foods it reminds her of. She will often kiss it which is something we have introduced which she has responded very well too. We may get a lick or a nibble from there woohoo, that is a huge success and worth celebrating for us.
 
As a reluctant trier of new foods I was unsure how this activity would go with Miss M. I hoped that it would be enjoyable and would provoke interest in exploring and investigating new foods and textures!
After her first bite I was a little worried as she put so much in it was an intense experience for her senses. I have been very pleasantly surprised, she seems more keen than ever to make things 'to taste'!
We have been very busy in our kitchen lately!!
 
 
For more science investigations for young children that can easily be done in the home please check out these links,
 
 
Enjoy,
 
Play and Learn
 
Katey


Science~ Lava lamps

 
Children's curiosity to 'find out' and know 'why' makes activities based around science so exciting for them.
 
Children are born keen observers and are always trying to understand the world around them. Science provides hands on opportunities for them to reinforce and build on these understandings.
 
However, it does not always go to plan!
 
One morning I was met with "Mummy, Mummy I want to make something in the kitchen!"
 
Already having a pantry full of homemade treats I suggested
"How about we do some science?"
 
Miss M "Yes, Yes, Yes"
 
"We can use some ingredients to make something very interesting to watch with our eyes!"
 
Miss M "And then we can taste with our mouths!"
 
"Oh no honey, we can't eat or taste this science, it will taste yucky. We will watch it with our eyes and it will look really interesting"
 
 
She seemed happy enough with this...
 
So we began to make, home made lava lamps


To make these, you will need
 
A tall glass
salt
cooking oil
water
food colouring
 
 
Fill your glass about 1/3 with water and add a few drops of food colouring - of your choice
 
 
Top with your oil.
Oil is less dense/ lighter than water so will sit on the top!
 
It was at this point Miss M went into toddler melt down!
 
I wondered what was going on, what was the problem... this was fun, wasn't it?
 
She muttered out through sobs
"I don't want the fizz, no bubbles, don't do it Mummy!"
 
???
 
"I don't want to make a 'cano' no!"
 
cano ??? oh Volcano, this was reminding her of when we made volcano science with vinegar and bicarb.
But why was this upsetting her, she enjoyed doing that??
 
When I managed to get to the bottom of it, I worked out that yes, she did think we were making fizzing volcano's and she was upset because she didn't want to do that, she knew she wasnt going to get to taste! She had wanted to make something to eat, she wanted to bake!
 
Mummy's fail- not listening to what she really wanted to do and instead trying to get her to do what I wanted instead.
 
We put our 'science' aside for awhile and distracted ourselves with other things!
Luckily the water and oil will happily wait.
 
Now to get back to the investigation
 
 
Sprinkle the salt into the glass and watch

 
 It was really hard to catch in a photo but you will see bubbles rising from the bottom to the top!

What is happening? ~ The salt is heavy and pushes the oil to the bottom of the glass. When the salt dissolves in the water the oil rises/ floats back to the top in bubbles!
Exciting to watch!

I was not going to share the story of Miss M's meltdown. I was simply going to share the experiement, however  I wanted to share that we don't always get things right as parents and things don't always go to plan.

Needless to say the next day we tried this simple science investigation that allowed her to taste, Sherbet

If your after other simple science investigations that are quick and simple to do at home, check at this link to
Milk Rainbows 


Enjoy

Play and Learn

Katey


Tuesday, 9 October 2012

Milk Rainbows/ Fireworks


This is a super fun and simple science investigation that your children will love!


You will need
 
approx 1cup milk
plate, bowl or similar
Food colouring
Dishwashing Detergent
eye droppers
Paper plate or paper and markers for drawing observations
 
 
Cover your plate or bowl with milk


Add just one drop at a time of your food colouring.
Your meant to add the drops around the edge of the plate and if I was doing this in the classroom I'd get my students to use only the primary colours so there would be just three areas around the edge of the plate with the food colouring.
(Things don't go quite the same with a 2yrold lol but the effect was still impressive even with the drops all through the milk)
 
 
Add one drop of your detergent and watch CLOSELY!
 
 
The colours will begin to move immediately.
Fascinating for little ones!


What is Happening?
 
The detergent does not mix with the milk. Instead it floats on top and spreads over the surface. As it spreads it grabs the food colouring and pushes it around!
 
Loving the language so far?


Even toddlers can draw their observations
 
Talk about how the colours are mixing!
swirling, whirling, twirling
combining, bumping, pushing
 
 
Noticing Miss M's eagerness to get her hands in the milk we used the handle end of a paintbrush to mix through creating an amazing result.
 
 
You can watch for ages, the colours will keep on moving!
 
 
Enjoy!
Katey